
A Basic Guide On How To Stream to Twitch With (Mobile + Desktop)
- Holden Stephan Roy
- Mar 22, 2023
- 10 min read

I’ve been a huge advocate of Twitch for a while. You dodge streaming restrictions other platforms throw at you. Anyone with Amazon Prime can subscribe to you, for free, which gives you money. If a whole bunch of us Twitch at once, we would all make some bread over time (I know, not right away, I get it).
Starting a new Twitch seems scary. This guide will explain the basics of how to stream to Twitch. We’ll cover how to do it on your phone, on a Windows computer and we'll start with some basic steps for Twitch account setup.
Streaming is a lot more about improving over time than being amazing out the gate. This article is going to cover a bunch of things at a top level. If you read to the end, you should be good to go live.
A basic breakdown
A lot of people are comfortable with Instagram or Facebook Live. You click on the option in the app and its very point and click. Twitch has a couple of more steps but is just as simple when you’re using a phone.
On a computer, you need to use another app to send the signal to Twitch. This guide will help people on Windows do this. The concept will remain the same for Mac users, but the apps you choose will be different.
You will need a “broadcasting” app. This is a tool that lets you fill out a canvas with things like:
Webcam and mic inputs
Images
Text
Animations
Twitch account notifications
The broadcasting tool is where you set up your stream. Using it to customize the look and feel. The best part is, it’s really easy to do this once you get the theory.
I know computer stuff can be daunting. Think of this as part one of a series. Today we’ll give you the bare bones version so you can get started.
The broadcast tool will connect to Twitch (Or YouTube, Facebook and a bunch of others). Once you bridge that gap, you are ready to press the Start Streaming button.
If ever you need help, create an account on this site and hit me up in the chat with questions.
Twitch Account Basics
You will need to set up your Twitch account from a website. The mobile app version is harder to use. For this kind of thing, find yourself a computer.
Do all the basic stuff like naming your channel and uploading your avatar image. There are 2 things you must know before you start.
How to keep your videos after you stream:
The main goal of Twitch is to stream live content. Video on demand (the term for videos you can playback) is a secondary feature on Twitch. You need to flick a switch to turn streams into videos.
Click on your account icon and choose Creator Dashboard.

Then choose Settings --> Stream
Flick the switch next to Store past Broadcasts.

Even if you plan to keep the video private, turn this on. You need to quality check your stream after the fact.
Twitch Categories and Tags:
Twitch does not have an algorithm like YouTube. To help strangers find your stream, put it in the right category.
Some common categories include:
Just Chatting – This tells people the audience is meant to engage.
Talk Shows & Podcasts – This is more of a show, less audience interaction.
Music – If you create or play music, go here.
Video Games – Pick a video game, there is a category for it.
People browse stream categories. The tags will pop up below your stream and be extra bait to get them to click.
For keyword inspiration, browse Twitch and go into the category you want to participate in. See what other tags people use. Copy the ones that make sense for you.
You can change all this in the Stream Manager.
Click this button with the pencil.

Update the settings in the window that opens. You can even do this mid stream.

Channel points are pretty cool
The Twitch chat is special because it lets people do fancy stuff. You can add custom emotes (Twitch emoticons). There are special chat commands, some are built in and some you can program with … more third-party apps we’ll talk about one day.
You don't need them to get started but there are a lot of fun things out there. Forever Preach had his whole chat gambling for awhile, using channel points.
People who stick around on your stream get channel points. Channel points are fluff currency that helps you reward people who spend time on your stream. Your job is to give them a reason to spend it.
You can customize what they are called and import your own design for them. Then you need to create rewards. Here are a few examples:
For 1000 points I will stand on one foot for 5 mins.
For 250 points I will drink water (or Rum if you are Blaster)
For 2500 points I will refrain from cursing

This keeps people engaged and makes them feel like part of the show. Enable them and take some time exploring, Twitch makes it easy to set up.
Go to Viewer Rewards
Choose Channel Points.
Turn them on.
Click into Manage Rewards & Challenges and see what you want to use.

There are many preset options you can pick from. I recommend adding a couple to have some flair.
Raiding is how you build
Raiding is the system when you end your stream by bringing your audience to another streamer. Trust me the people you raid will remember it. The other day at Belmont I met DJ DiBiase in real life, he knew exactly who I was because he became my Wednesday night raid person.
To successfully raid folk, you first need to follow other creators. They will then show up when they are online making it easy to pick one to raid.
The raid option is activated with a chat command.
Type in “/raid <channel name>” then press enter.

You’ll see a popup to tell you the raid will start soon.

Click on Raid Now when it's ready.
I recommend you load the channel before you raid so you can hear the sweet “THANKS FOR THE RAID”. It’s real nice.
The channel name is what comes after twitch.tv/ when you load a channel.

Since there is no algorithm, your best opportunity to grow is to raid people who do similar content as you. They will then raid you back, introducing their audience to your channel. You’ll find most creators are pretty chill and down to build with you.
At this point your Twitch is ready to receive a signal.
Twitch Mobile is point and click
When you login to your Twitch account on the mobile app, you can start streaming right away. You can choose between your front and rear cameras. Then you are ready to stream.
To get all the fancy features like floating text on your podcast, you will need a computer. This is the you are out and about and want to stream version. Good for live sets.
Step 1 – Click Create
This feature is in the top right corner and will flip Twitch into creator mode.

Step 2 – Click Go Live
It’s a floating button on the screen that moves with you. Click it.

Step 3 – Games or IRL?
If you are playing a game, choose that. I am sure most of you reading this, want the IRL option, which goes straight to the camera.
Pick the one you want to use.

Step 4 – Name that stream
Click the pencil icon to name your stream and set the category.

Then you can add/edit any tags.

Step 5 – Broadcast and go Live
You can use the circle arrow icon to flip the camera. Then when you are ready hit the broadcast icon.

You are now live, congrats, enjoy the Twitch life. The next sections will help us customize the stream from a Windows computer.
OBS is for the Windows People
I use OBS when I stream. It’s free and basically gives you all the options you could ever need. Every other app will have a similar setup structure to follow when you set up a stream.
You can download and install OBS here. During installation, tell it you want to stream and click next on everything. You can customize settings later.
A lot of the blockers people face is all the new terms they see. To use the app, you need to make sense of the jargon.
Once you understand the basic structure behind OBS, you will feel a lot braver. There are a lot of tutorials out there that can tell you how to do specific things. Pretty much everything you could ever want to do is well documented with easy to follow steps.
As time goes on, you’ll find a bunch on this very blog, tell me in the comments what to cover next.
Sources in OBS

Sources are the pieces that make up your video. When you open OBS, the basic setting is a blank canvas. The reason it’s called a source is because you are telling OBS where on your computer, or the internet, the element you want to add is located.
You probably want a webcam on your feed. You need to have OBS scan the webcams that are available and pick one. Then the webcam will appear and you can resize it or place it anywhere you want.
If there is an image you want to add, you will tell OBS where the file is saved. You can add a lot of things to your stream, but they all follow the same basic principle.
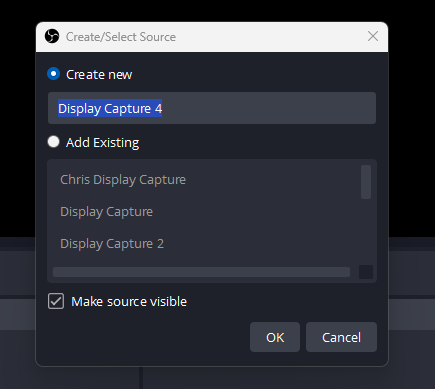
Step 1 – Choose Source type
Click the + to open a list of all the possible sources. Then click on the one you want to add.

Step 2: Name it and set the properties
Once your source is added you need to configure it further. First name it:
Then you choose the feature specific properties:

Step 3: Move it and resize it
You’ll see what you added appear right away. Both in the list of sources and on your canvas. While selected, you can now move it around and resize it.

Tip – Hold the alt key while resizing an element to crop it
Step 4: Layer it correct
The sources will be layered in the order they appear. You can use the up and down arrows to change the order.

Scenes in OBS
Scenes are your custom templates. Each is a combination of sources and their arrangement.
Streamers use scenes to have a custom layout for each part of their stream.
There may be a “Starting Soon” scene that contains branding and a timer. You may have a 2 person and a 3 person interview set up, where everything is cropped for where Zoom places people.
While broadcasting you can swap between them over here:

The scenes will swap in real time as you click on them. OBS includes a transition tool that can add an effect/sound while you change scenes.
There are two ways to create a new scene.
Use the + button to create a blank canvas.
Right click on an existing screen to duplicate it.

Video and output settings in OBS
I have changed very few settings in OBS. I will inevitably learn more about them so I can share what I learn with you. That’s right I do create my own carrots to dangle in my own face.
I recommend you double check the video/stream settings.
The thing about these settings is they are based on what your computer and internet can handle. The Settings option is located on the screen on the right.

This is not high-quality YouTube, it’s streaming. Aim for 1080 resolution but, anecdotally some people can’t load that. Using a 720 resolution can be more accessible. I stream in 1080. I use these settings:

The video settings are the default to what gets captured.
I don’t have that much to comment on the Output settings. You can decide where the videos you record with OBS get saved here in the Recording Path option. Here is the rest of my settings:

In the streaming settings by default you will have access to one streaming source at a time.
This means you can only stream to Twitch, or Facebook or YouTube.
Each site has it’s own way of connecting to OBS but it will be either.
You grant authorization to the app by logging in.
You get the stream key from the app you want to stream too and add it.
Once configured you are good to stream. There are other tools that let you multicast like Restream but that’s a tale for another blog.
Sound check is important, stop skipping it rappers
OBS captures whatever the canvas displays and creates a video, a stream, or both. Before streaming you can test everything easily by using Start Recording.

You can see how everything looks and sounds in the video. If there are audio issues you can tweak them. You can also identify right away if you are facing latency issues.
Latency settings and sound control:
Latency is adding a delay on a content signal, so everything lines up. Video and audio will be processed at different rates. It’s subtle, but 2 hours into your stream it will be very very noticeable.
You can adjust the latency in the advanced audio settings. Solving latency issues is a big tangent. I made this video that covers what you need to know to manage this and it has better visuals:
Okay your checks are solid, you are ready to stream.
Streaming with OBS
Once you are ready to go, click Start Streaming.

Once you are live it's important to have someone in the chat who can make sure the audio sounds good. During your stream the following may happen:
You play songs that are mastered to very different volumes.
You start your stream next to your mic and at 47 minutes are 2 inches back.
You invite a buddy onto Discord to talk.
As the sounds all get processed in real time they will show up in the Audio Mixer section.

Using the sliders you can change the volume as you stream. I try and make all the vocals hit the same part, and have any content we play a bit less loud under it.
You can access the advanced audio properties to give your mic a boost if needed.
Click the 3 dots next to any channel.
Click Advanced Audio Properties.

You can see I boost my mic right up:

Conclusion
There is a lot more things you can do to get your stream looking pristine. Today we looked at the basic setup you need in Twitch, then how to set up OBS.
We covered the point and click version and a quick view of a custom setup. There is a lot more you can do to spice up your life on stream. There are a lot of apps and choices.
This will be a journey you can take at our pace, but it is a journey. Once you learn one thing you will only want to know more.
If you have questions, let me know. Live Long and Prosper Everyone
Comentarios